Vertical planters are a great way to grow a lot of fruit and veg in a limited space. The perfect solution for small suburban gardens and apartments with a small balcony.
After checking out vertical strawberry planters for sale on Amazon and further research on YouTube, we decided to make our own. We’d bought the heavy-duty, plastic wine/water storage barrel second-hand at a local market for just a few euros. We were a little apprehensive because we had never tried to remould plastic, but it was surprisingly easy.
Materials
Plastic Barrel
4-inch drainpipe/plastic tube.
Gravel/small stones
Circle of Membrane
Plastic bottle or similar for sealing off the top of the pipe.
Plastic container to hold pipe and provide a small reservoir
Tools
Gloves
Marker Pen
Tape measure
Drill with 1/4 inch bit (approx) to make the initial hole for the pad saw
Pad Saw
Cat’s Paw / crowbar
Heat Gun
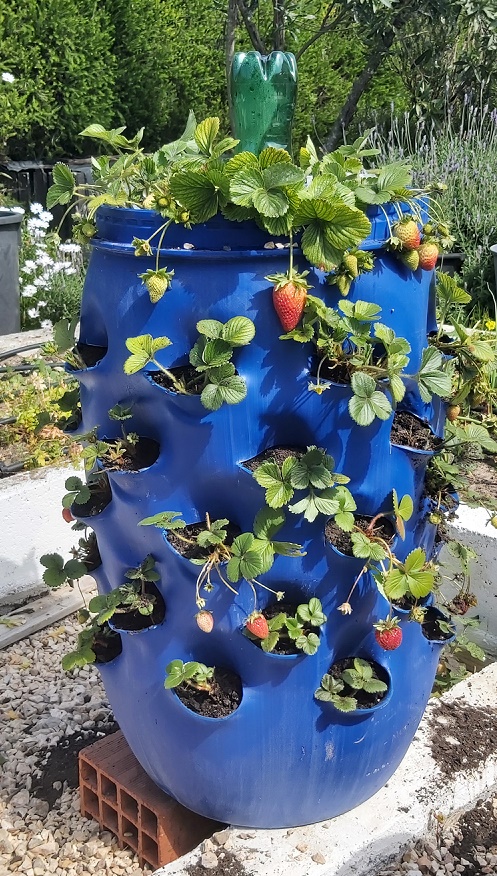
Method
- Mark out the barrel. The circumference of our barrels is 157cm at the widest point, top and bottom. The space between 40 cm. Each slot is 10cm with a 10cm space between. A picture saves a thousand words. You will notice from the diagram I staggered the rows. there are no planting slants at the back of the barrel as it is north-facing.

2. Use the drill bit to make an incision and cut the slot with the pad saw. Mr. Piglet initially used a jigsaw to cut the slots, but he found it awkward.
3. Once the slot is cut, use the heat gun to soften the plastic around the slot.


4. Once the plastic begins to soften, insert the cat’s paw, still applying heat. Gradually insert the neck of the bottle. Tip: If the plastic is not soft, remove the bottle and continue to work the slot with the cat’s paw until the area is malleable enough to insert the bottle. Do not be tempted to continue heating while the bottle is inserted. Let the plastic cool before removing the bottle.


5. Continue the process until all slots are moulded into planting cups: Tip: Do not heat adjoining slots while a bottle is still in situ.


6. Cut a receptacle for the pipe to sit in. This also acts as a water tray and helps retain some of the water.
7. Drill holes in the pipe large enough for a worm to enter. Apparently, you stuff the centre tube with green waste, which breaks down and feeds the plants. The number of holes? I filled the pipe with green waste and stood in the receptacle to test how quickly the water seeped through. I decided there were not enough holes and added more to the top.


8. Drill drainage holes in the bottom of the planter. (Yes, it is beginning to look like one now.)
9. Cut water-permeable membrane. This helps to prevent the soil from seeping through and washing away.


10. Place the drainage receptacle at the bottom of the planter.
11. Insert pipe
12. Cover the bottom of the container (about 10cm) with gravel, including the water receptacle so the surface is level.
13. Add the membrane.
14. Fill the pipe with waste destined for the compost heap. ETA: I tried this method and even though I only added green waste the pipe and earth became infested with fruit flies. I have since filled the central watering system with a mixture of gravel, manure, and compost to slow water movement, and this works well. I now use liquid manure or organic fertiliser on occasions.


15. Seal off the pipe with a plastic bottle or something to stop insects, etc., from entering the pipe area. This must be snug but removable.


16. Add good-quality compost and plant the strawberries layer by layer, watering the compost as you plant each layer.
17. Fill the top of the vertical strawberry planter with strawberry plants or another crop. Add a membrane between the plants to prevent the top layer from drying out.

I suggest watering each individual planting cup to prevent the exposed soil from drying out until the strawberry plant’s roots are established.
Next project: Add protective netting to prevent the birds from eating the strawberries.
Have you tried this method of gardening? I’d love to hear the results.


I made a compost bin out of such a barrel. Didn’t think of a strawberry planter. Might work for tatties, too?!
LikeLiked by 1 person
IT probably would but this is a big container. When we grew tatties in pots we used huge plastic pots which we emptied one at a time. This you would need to upend and it’s very heavy.
LikeLiked by 1 person
Good job and that’s smart! I built something similar last summer (much smaller): https://x.com/frdvil/status/1657000271052980225?s=20 and it worked well. I picked early strawberries, earlier than those in the ground.
LikeLike
I like the idea you used a central support. I did wonder how the plastic bottles were going to stay upright. Great idea!
LikeLiked by 1 person
Interesting idea.
LikeLike
This an amazing idea and a wonderful tutorial. You’re going to have lots of delicious strawberries soon.
LikeLike
I hope so. The strawberry plants have been growing in little pots for months waiting to be planted out. Phew! A lot of work but I hope it’s worth it.
LikeLiked by 1 person
I’d love to see how u net this. Does netting need a frame or else birds will nab the fruit.
LikeLiked by 1 person
Hi, i was going to create a cross of two pieces of wood and drape the netting across that but unfortunately where every YouTube video i watched said. Fill the pipe with waste destined for the compost heap…
where we live this attracted an infestation of fruit flies which have laid eggs in the soil so I have had remove ALL the strawberry plants and wash off all the soil from the roots and plant elsewhere. I can then treat the planter soil with a chemical to kill the eggs.
I do not recommend as they suggest. I will experiment using another central watering system and will edit my post above.
LikeLike
Nice! Attractive as well as useful. Beautiful blue.
LikeLike
Thanks, Laurie. I may make another but not quite as big. I also like the blue!
LikeLiked by 1 person